abi와 bin파일이 생성되는 흐름을 JS로 알아보기
이전에 이렇게 코딩하면 알아서 abi 파일과 bin 파일을 만들어서 저장해줬다.
어떤 과정을 거쳐서 만들어지는건지 JS 컴파일을 통해서 알아보자.
앞으로 truffle을 사용할건데, 트러플이 어떻게 굴러가서 각 파일을 생성하는지 흐름을 알기 위해서.
npx solc --bin --abi HelloWorld.sol
web3 라이브러리를 가지고 막코딩보다 조금 더 수월하게 작성하게 해줌

예전에 만들었던 geth 과정 중에서 node/keystore을 보면 UTC 파일들이 있다.
자바스크립트로 스마트 컨트랙트를 만들때 privateKey가 있어야 서명도 만들고 거래가 가능했었다.
geth에서 그 privateKey기능을 해주는게 UTC파일이다.
양방향 암호화가 되어있어서 특정한 문구가 있으면 본래 파일로 돌릴 수 있는 복호화가 가능하다.
복호화를 통해서 개인키를 만드는 2가지 방법
- keythereum에서 복호화
- web3 라이브러리에서 복호화
keythererum으로 복호화하기
// descryp.js
const keythereum = require("keythereum");
const path = require("path");

// keystore 안에서 복호화할 계정을 하나 가져옴
const address = "0xdd4167694a22bdd97ee00b0e14d80094e4728160";

// 현재 사용하고있는 파일의 위치 알려줌
// keystore을 사용할거니까 keystore폴더가 있는 위치를 넣어주었다.
const dir = path.join(__dirname);
// >> /Users/hancoco/workspace/220712

// dir을 순회하면서 address랑 같은 값을 가지고있는 파일을 찾아낸다.
const keyObject = keythereum.importFromFile(address,dir)

// 찾은 파일을 복호화해서 개인키를 추출함
const privateKey = keythereum.recover("1234",keyObject).toString("hex")
console.log(privateKey)
// d1db0972571711c91de215fe84f5aafca340fccf044e89b504f2dfe7d5bb926a
접근제한자 public과 getter의 관계
상태변수를 가져오는 getter vs 상태변수를 변경하는 setter
typescript를 제외한 다른 언어들은 public을 쓰면 왠만하면 getter를 만들어준다.
왜냐하면 public은 누구나 어디서나 사용할 수 있어야하니까!
이더리움 네트워크에 있는 스마트 컨트랙트를 꺼내서 실행시키려면 abi 파일을 갖고있어야 사용이 가능하다.
따라서 public을 사용하면 자동으로 getter가 생기고, abi파일도 자동으로 생긴다.
abi 파일이 없다는건 public이 아닌 다른 형태라는것.
// contracts/HelloWorld.js
// SPDX-License-Identifier: MIT
pragma solidity ^0.8.15;

contract HelloWorld{
  string public value; // public을 사용하면 자동적으로 생성되는 getter

  constructor(){
    value="Hello World";
  }

  // getter 작성하지않아도 이미 내부적으로 작성되어있다
  // function getValue() public view returns(string memory){
  //   return value;
  // }

  // setter
  function setValue(string memory _v)public{
    value = _v;
  }
}
컴파일할 형태 기본 골격
이 상태에서 수많은 데이터가 줄줄이 나온다면 성공.
const solc = require("solc"); // 솔리디티 컴파일러

// 스마트 컨트랙트를 어떻게 만들거냐 - 규격정하기
const data = JSON.stringify({
  language: "Solidity",
  sources: { // 어떤 파일을 가져올건지
    "HelloWorld.sol": { // 파일 이름
      content: `// SPDX-License-Identifier: MIT
      pragma solidity ^0.8.15;

      contract HelloWorld{
        string public value;
        constructor(){ value="Hello World"; }
        function getValue() public view returns(string memory){
          return value;
        }

        function setValue(string memory _v)public{
          value = _v;
        }
      }`,
    },
  },
  settings: { // 어떤 세팅으로 할건지
    outputSelection: {
      "*": { "*": ["*"] },
    },
  },
});

solc.compile(data) // 컴파일한 결과물을 줌
console.log(solc.compile(data))
// 해당 위치에서 해당 이름을 갖고있는 파일을 찾아서 해당 포맷으로 파일을 읽음
fs.readFileSync(path.join(__dirname, "../contracts", "HelloWorld.sol"), "utf8");
코드 간단하게 만들기
const solc = require("solc");
const fs = require("fs");
const path = require("path");

class Contract {
  static compile(_filename) {
    const contractPath = path.join(__dirname, "../contracts", _filename);
    const data = JSON.stringify({
      language: "Solidity",
      sources: {
        [_filename]: {
          content: fs.readFileSync(contractPath, "utf8"),},},
      settings: {
        outputSelection: {
          "*": { "*": ["*"] },},},});
    console.log(solc.compile(data)); // 컴파일한 결과물을 줌
  }}
Contract.compile('HelloWorld.sol');
객체 안에 있는 abi 파일 꺼내오기
const solc = require("solc");
const fs = require("fs");
const path = require("path");

class Contract {
  static compile(_filename) {
    const contractPath = path.join(__dirname, "../contracts", _filename);
    const data = JSON.stringify({
      language: "Solidity",
      sources: {
        [_filename]: {
          content: fs.readFileSync(contractPath, "utf8"),
        },},
      settings: {
        outputSelection: {
          "*": { "*": ["*"] },},},});
    const compiled = JSON.parse(solc.compile(data))
    Contract.writeOutput(compiled)
  }
  static writeOutput(_compiled){
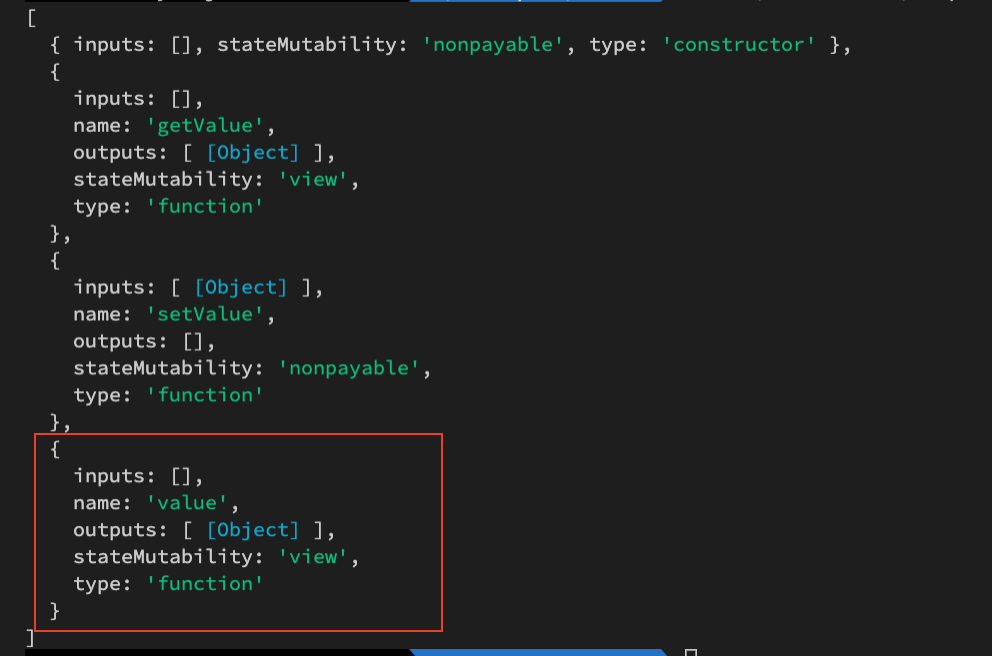
    console.log(_compiled.contracts['HelloWorld.sol'].HelloWorld.abi)
  }
}

Contract.compile("HelloWorld.sol");
만들지 않은 value 함수가 생성되어 있다. 이게 public을 사용했을때 자동으로 만들어지는 getter함수!
그래서 굳이 getter함수를 만들지 않아도 된다.
컴파일하는 법을 이렇게 익혀두면 나중에 출력값을 확인하려고 일일히 코딩 안해도 되서 편하니까 알아두자.
반복문으로 필요한 부분만 추출하기
static writeOutput(_compiled) {
    for (const contractFileName in _compiled.contracts) {
      const [contractName] = contractFileName.split(".");
      // console.log(_compiled.contracts['HelloWorld.sol'].HelloWorld.abi)
      console.log(_compiled.contracts[contractFileName][contractName].abi);
      console.log(
        _compiled.contracts[contractFileName][contractName].evm.bytecode.object
      );
    }
}


// 단순화
static writeOutput(_compiled) {
    for (const contractFileName in _compiled.contracts) {
        const [contractName] = contractFileName.split(".");
        const contract = _compiled.contracts[contractFileName][contractName]
        const abi = contract.abi
        const bytecode = contract.evm.bytecode.object
    }
}
특정 객체를 가진 파일로 내보내기
정상적으로 실행되면 abi, bytecode를 객체로 갖고있는 파일이 생성되어서 build 디렉토리에 저장된다.
// 파일로 내보낼 객체
const obj = { abi, bytecode };

// 파일경로는 절대경로를 넣어줘야한다
const buildPath = path.join(__dirname,"../build",`${contractName}.json`);
fs.outputJSONSync(buildPath, obj);
싱글톤 인스턴스
스마트컨트랙트를 이더리움 네트워크에 올릴때(배포=deploy) 객체가 1개 생김 = 싱글톤
js는 class 같은 이름으로 생성해도 매번 새로운 메모리를 할당함 이건 싱글톤 아님
싱글톤은 같은 이름을 쓰면 같은 메모리를 바라보게하는것 = 리액트 특화
값을 전달할때 자주 쓰임
싱글톤이 정말 같은 메모리를 바라보는지 확인하기
const Web3 = require("web3");

let instance;
class Client {
  constructor(_url) {
    if (instance) return instance;
    this.Web3 = new Web3(new Web3.providers.HttpProvider(_url));
    instance = this;
  }
}

const client1 = new Client("ws:127.0.0.1:9005")
const client2 = new Client("ws:127.0.0.1:9005")
console.log(client1===client2)
// >> true
deploy = 배포하기
배포할때 바이트코드가 필요하다.
txobject{
    누가(account),
    무엇을(data:bytecode)
}
tx를 발생시키는 두가지 방법
- eth.sendTransaction()
- const contract = eth.contract(abi) -> contract.new(txObject)
const { Contract } = require("./controllers/compile");
const { Client } = require("./controllers/client");
const Web3 = require("web3");
const [abi, bytecode] = Contract.compile("HelloWorld.sol");
const client = new Client("http://127.0.0.1:8545");

const txObject = { data: bytecode };

const contract = new client.web3.eth.Contract(abi);
// web3 -> deploy
// geth에서는 contract.new(txObject) 였음 -> 요청을 하면 응답을 할때까지 기다렸다가 응답이 오면 뜸
// js는 싱글스레드 요청을 하면 응답이 와야 다음걸 실행할 수 있음 -> 반환값이 promise 객체
contract
  .deploy(txObject)
  .send({ from: "0x6B00e36eaE2d7B5d3655C1AAbC5B618a5ec71518", gas: 3000000 })
  .then((instance) => {
    console.log(instance.methods);
    console.log(instance.options.address);
  });
배포한 후 컨트랙트 내용 가져오기
contract.methods
  .value()
  .call()
  .then((data) => {
    console.log(data);
  });
배포한 후 내용을 변경하기 = 해당 CA에 tx를 발동시킬때
contract.methods
  .setValue("ingoo")
  .send({
    from: "0xDa34883a43129342e1ABD17a8114609f145F40D2",
  })
  .then((data) => {
    console.log(data);
  });
'프로그래밍 > solidity' 카테고리의 다른 글
| [220713] 스마트 컨트랙트 구현하기 - 1) 트러플로 구현하기 (0) | 2022.07.13 |
|---|---|
| [220712] 트러플로 스마트 컨트랙트 만들기 (0) | 2022.07.12 |
| 크립토좀비) 챕터3 개념 (0) | 2022.07.06 |
| 크립토좀비) 챕터4 개념 / payable, transfer (0) | 2022.07.06 |
| [220711] 솔리디티코드로 스마트 컨트랙트 작성하기 (0) | 2022.07.04 |


댓글