React로 프런트 구조 짜기
트랜잭션을 일으키려면 개인키(privateKey)가 필요하다.
하지만 프런트에서 직접적으로 개인키를 사용하기엔 보안이 위험하다.
집적적으로 사용하지 않기 위해 메타마스크(월렛)를 사용해 서명 처리를 할 것이다.
따라서 화면 -> 메타마스크 -> 이더리움 네트워크 이렇게 거쳐가도록 구성을 짤 것이다.
React로 메타마스크와 web3 연결하기
메타마스크와 연결해서 계정 정보를 가져오고 web3를 연결하는 코드를 작성한다.
// react/src/hooks/useWeb3/jsx
import React,{useEffect, useState} from 'react'
import Web3 from "web3/dist/web3.min"

const useWeb3 = () => {
  const [account,setAccount] = useState(null) // 메타마스크가 사용하겠다고 선언한 계정정보
  const [web3, setWeb3] = useState(null) // web3가 메타마스크와 연결이 된 내용을 가져옴

  useEffect(() => {
    (async () => {
      if (!window.ethereum) return;
      const [address] = await window.ethereum.request({
        method: "eth_requestAccounts",
      });

      setAccount(address);
      const web3 = new Web3(window.ethereum);
      setWeb3(web3);
    })();
  }, []);

  return [web3, account]
}

export default useWeb3
Web3를 그냥 web3에서 가져오면 nodeJS에서 사용하는 web3관련한 파일까지 모두 가져와버린다.
예를 들면 nodeJS에서 buffer도 가져와버리는데 리액트에서는 buffer 개념이 없어서 필요가 없다.
번들(웹팩)이 브라우저를 위해 코드를 해석해줄때 쓸 수 있는 라이브러리만 있는 web3/dist에서 가져온다.
( web3/dist가 없다고 할 경우 이슈 해결 : https://hancoco.tistory.com/292 )
import Web3 from "web3/dist/web3.min"
useEffect를 실행하면 즉시 async가 붙은 콜백함수가 실행되는 코드다.
렌더링이 모두 끝난후에 실행되는 ComponentDidMount를 구현했다.
  useEffect(()=>{
    (async () => {})(); // 즉시 실행함수
  },[]) //ComponentDidmount일때 실행
메타마스크를 설치하면 자동으로 window객체에 ethereum을 만들어준다.
이더리움 네트워크와 RPC통신을 하기 위해서 요청을 날려준다.
메타마스크와 연결된 계정의 내용을 가져오고 싶기때문에 요청내용은 "eth_requestAccounts"로 적는다.
if (!window.ethereum) return;
  const address = await window.ethereum.request({
  method: "eth_requestAccounts",
  // parameter: []
});
가져온 계정정보로 account 상태값을 업데이트 한다.
연결된 이더리움 네트워크 정보로 web3 인스턴스를 생성해주고, web3 상태값도 업데이트 해준다.
setAccount(address);
const web3 = new Web3(window.ethereum);
setWeb3(web3);
useWeb3를 실행할 app.jsx 파일을 작성하자.
// app.jsx
import useWeb3 from "./hook/useWeb3";
import Counter from "./components/Counter"

const App = () => {
  const [web3, account] = useWeb3();

  if(!account) return <>메타마스크 연결 안했다ㅏㅏㅏ</>
  return (
    <div>
      <div>Account : {account}</div>
      <Counter account={account} web3={web3} />
    </div>
  );
}

export default App;
위에서부터 읽어내려오던 코드는 여기서 useWeb3.jsx파일로 넘어가서 초기값을 들고 온다.
const App = () => {
  const [web3, account] = useWeb3();
  // 여기서 useWeb3.jsx로 넘어감
  // 초기값 [null,null]
컨트랙트를 실행할 Counter.jsx 컴포넌트를 작성해보자.
import React, { useState, useEffect } from "react";
import CounterContract from "../contracts/Counter.json";

const Counter = ({ web3, account }) => {
  const [count, setCount] = useState(0);
  const [deployed, setDiployed] = useState();
  console.log(web3);
  console.log(account);

  const increase = async () => {
    const result = await deployed.methods.increment().send({
        from: account,
      });
      if(!result) return;
      const current = await deployed.methods.current().call();
      setCount(current);
  };

  const decrease = async () => {
    const result = await deployed.methods.decrement().send({
        from: account,
      });
      if(!result) return;
      const current = await deployed.methods.current().call();
      setCount(current);
  };

  useEffect(() => {
    (async () => {
      if (deployed) return;

      const Deployed = new web3.eth.Contract(
        CounterContract.abi,
        "0x7aA13EE2A1eBdf34e34FfF61b6fED16A70ddF80A"
      );

      const count = await Deployed.methods.current().call();
      console.log('count : ',count) //BN

      setCount(count);
      setDiployed(Deployed);

    })();
  }, []);

  return (
    <div>
      <h2>Counter : {count}</h2>
      <button onClick={increase}>증가</button>
      <button onClick={decrease}>감소</button>
    </div>
  );
};

export default Counter;
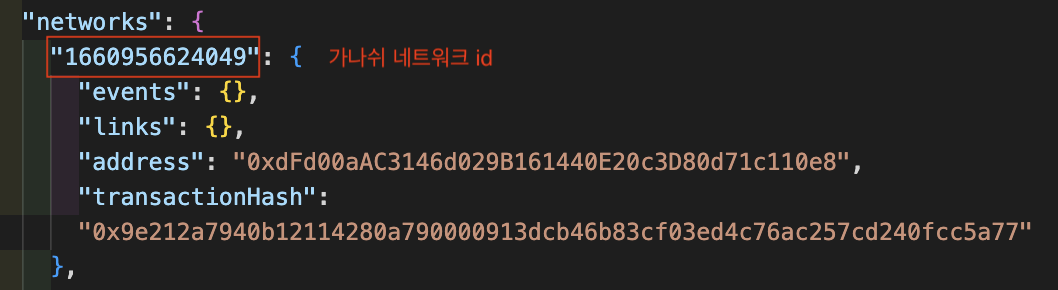
이 곳에서 배포된 컨트랙트 정보를 가져오기위해 eth.Contract(ABI, CA)메서드를 사용해 해당 컨트랙트에 접근한다.
이미 트러플로 컴파일과 배포를 해놨기때문에 나에게 ABI, CA정보가 있는 json 파일이 build파일에 있다.
CA값은 CounterContract 안에 있는 networks에서 네트워크id에서 가져온다.
  useEffect(()=>{
    (async () => {
      // 배포가 되었는지 먼저 확인
      if(deployed) return

      const Deployed = new web3.eth.Contract(
        CounterContract.abi, // ABI
        "0xdFd00aAC3146d029B161440E20c3D80d71c110e8" //CA
      )
    })()
  },[])
current 값을 가져오게 호출을 해보고, 결과값이 나온다면 잘 연결된 것이므로 상태값을 각각 업데이트 해준다.
const count = await Deployed.methods.current().call();
setCount(count)
setDeployed(Deployed)
current값이 호출된다는건 그 안에 있는 함수들도 호출이 된다는 소리다.
앞에서 작성해두었던 increase, decrease 메소드를 가져와주었다.
해당 메서드가 실행될때마다 변수 result에는 트랜잭션 값이 담길것이다.
send()는 call()과 같은 호출함수지만, call()은 비용이 들지 않는 view일때 사용 가능하다.
비용이 드는 일반함수나 payable은 send()로 호출한다.
  const increase = async () => {
    const result = await deployed.methods.increment().send({
      from: account,
    });
    if (!result) return;
    const current = await deployed.methods.current().call();
    setCount(current);
  };

  const decrease = async () => {
    const result = await deployed.methods.decrement().send({
      from: account,
    });
    if (!result) return;
    const current = await deployed.methods.current().call();
    setCount(current);
  };
클릭할때마다 이벤트가 발생하도로고 html 코드를 짜준다.
이제 버튼을 클릭할때마다 트랜잭션이 발생하고 메타마스크는 서명값을 요구하기위해 자동으로 켜질것이다.
<div>
  <h2>Counter: {count} </h2>
  <button onClick={increase}>증가</button>
  <button onClick={decrease}>감소</button>
</div>
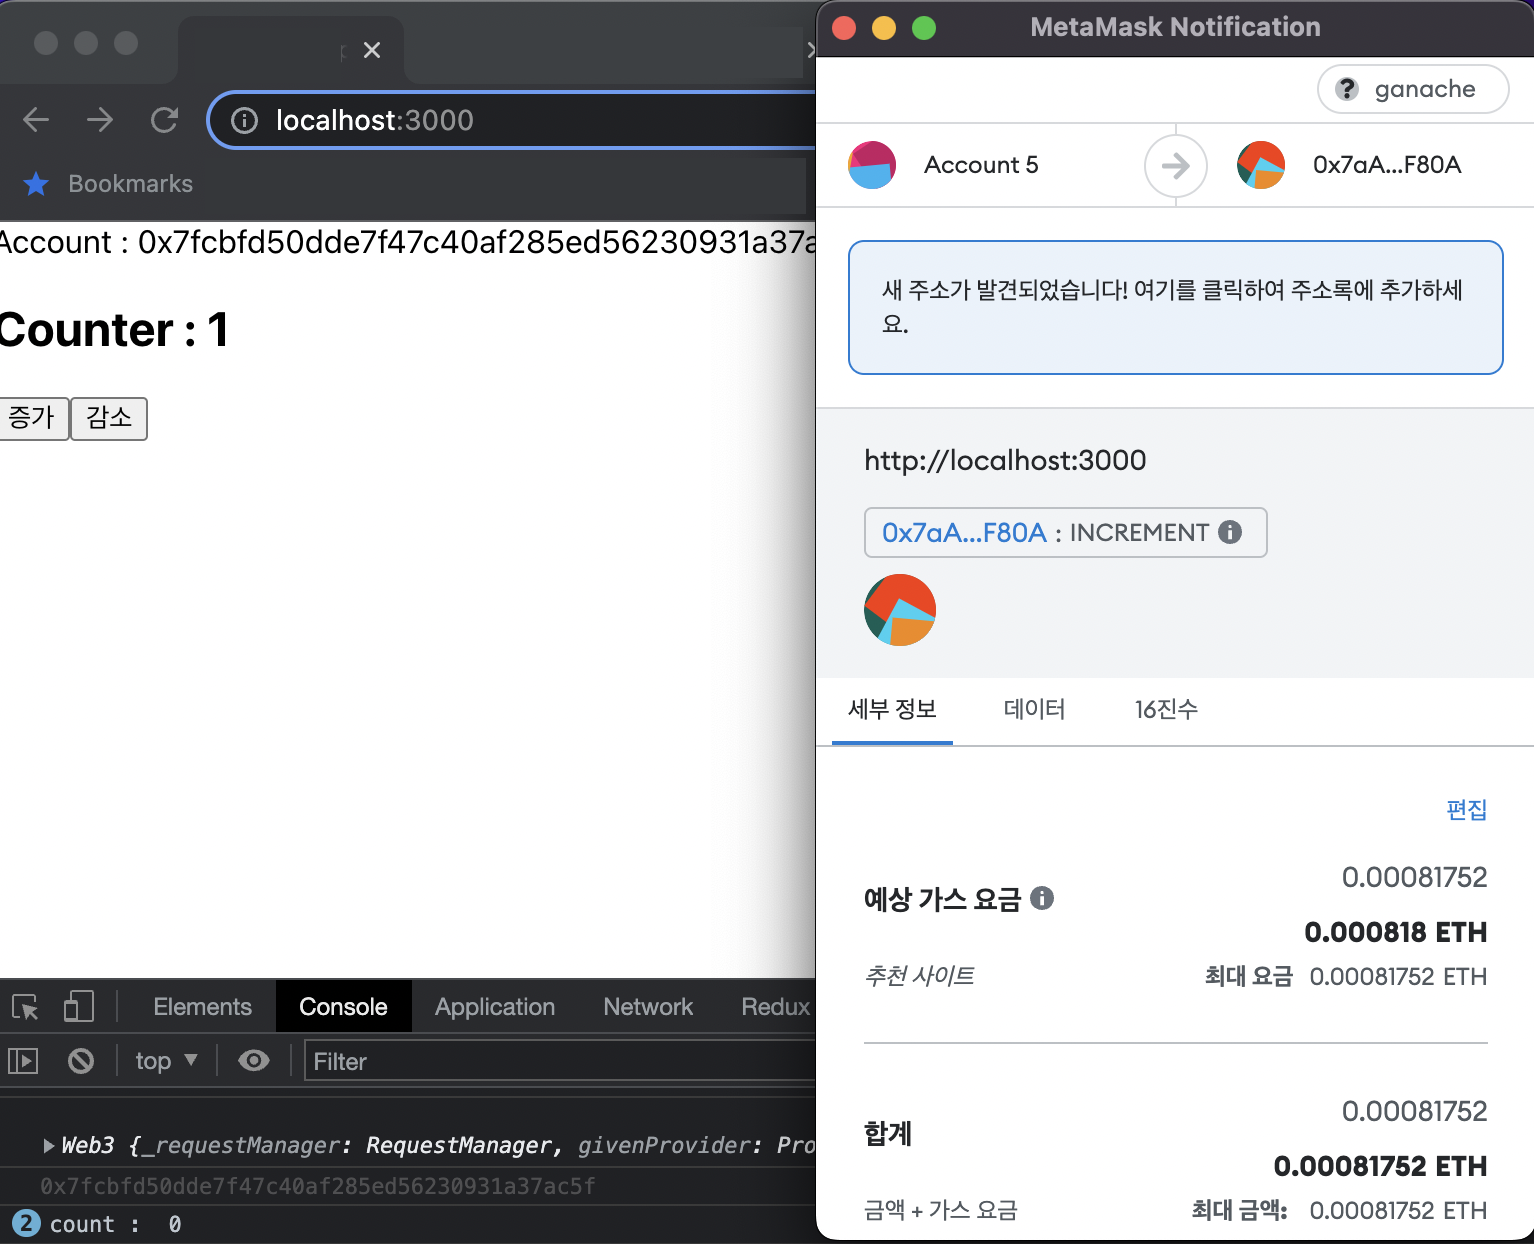
트랜잭션 생성 & 처리까지의 흐름
증가/감소 버튼을 누르면 현재 localhost:3000과 연결되어있는 계정이 뜨고,
메타마스크가 이정도 가스가 소비될건데 정말로 트랜잭션을 일으킬거냐고 물어보는 화면이다.
동의한다면 트랜잭션이 발동되고, 이 내용은 이더리움 클라이언트에게 전달된다.
채굴이 되며 블럭이 생성되면 트랜잭션 내용이 처리가 된다.
'프로그래밍 > solidity' 카테고리의 다른 글
| ERC721토큰 (0) | 2022.07.18 |
|---|---|
| [220714] 스마트 컨트랙트 구현하기 - 3) 이벤트 (프런트 / 백) (0) | 2022.07.17 |
| [220713] 스마트 컨트랙트 구현하기 - 1) 트러플로 구현하기 (0) | 2022.07.13 |
| [220712] 트러플로 스마트 컨트랙트 만들기 (0) | 2022.07.12 |
| [220712] JSON 컴파일을 구현해서 abi, bytecode 파일 생성, 배포하기 (0) | 2022.07.06 |


댓글