기본적인 설치를 끝마친 후에 다음으로 진행하자.
잘 모르겠다면 이 시리즈의 처음부터 다시 보고오면 된다.
npm init
npm install express
npm install nunjucks
https://hancoco.tistory.com/392
00. 개발환경 만들기
개발 기억을 복구하기 위해서 만드는 시리즈. 아무것도 없는 지식부터 홈페이지를 만들 수 있도록 진행할 예정이다. 개발환경 : 맥북에어(실리콘칩) 개발환경 만들기 https://hancoco.tistory.com/68 [2201
hancoco.tistory.com
1. nodemon 설치
우선 매번 서버를 껐다켰다하면서 사이트 새로고침하기 귀찮으니까,
자동으로 수정된 코드를 업데이트 해주는 nodemon을 설치했다.
https://hancoco.tistory.com/119
[220303] npm과 jwt을 활용해서 로그인 확인 기능 만들기
[목록] 1. npm 명령어로 서버 시작하기 2. 코드를 자동으로 갱신해주는 nodemon 3. 로그인시 jwt 생성하기 4. 로그인 확인을 위해 쿠키에서 jwt 정보 추출하기 5. try/catch문을 통해 응답코드 짜기 1. npm 명
hancoco.tistory.com
npm을 사용해서 nodemon을 설치하는 법은 위를 참고하자.
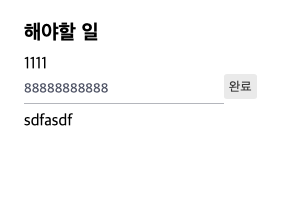
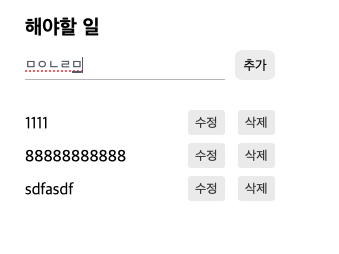
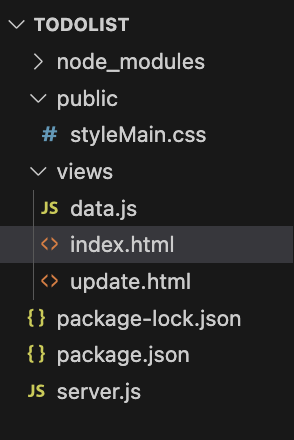
2. 앞으로 만들 투두리스트
파일들은 총 이렇게 구성되어 있다.
3. 코드 짜기
index.html
더보기
<!DOCTYPE html>
<html lang="en">

<head>
  <meta charset="UTF-8">
  <meta name="viewport" content="width=device-width, initial-scale=1.0">
  <title>Document</title>
  <link rel="stylesheet" href="./styleMain.css" type="text/css">
</head>

<body>
  <div id="container">
    <!-- 해야할 일 -->
    <div class="todoBox">

      <!-- 타이틀 -->
      <div id="titleText">해야할 일</div>

      <!-- 입력창 -->
      <div class="inputBox">
        <form method="post" action="/add" class="inputForm">
          <input type="text" name="todoText" class="titleInput">
          <input type="submit" value="추가" id="addBtn">
        </form>
      </div>

      <!-- 리스트가 생성될 자리 -->
      <div>
        <ul>
          <!-- 만약 data 값이 참이라면 -->
          {% if data %}

          <!-- for 반복문으로 넘어간다 -->
          <!-- data값을 item으로 받아와서 li를 반복적으로 만들어낸다 -->
          {% for item in data %}
          <li class="list">
            <p class="listText">{{item.todoText}}</p>
            <a href="/update?index={{loop.index}}" id="modBtn">수정</a>
            <a href="/delete?index={{loop.index}}" id="delBtn">삭제</a>
          </li>
          {% endfor %}
          {% endif %}
        </ul>
      </div>
    </div>
  </div>
</body>

</html>
update.html
더보기
<!DOCTYPE html>
<html lang="en">

<head>
  <meta charset="UTF-8">
  <meta name="viewport" content="width=device-width, initial-scale=1.0">
  <link rel="stylesheet" href="./styleMain.css" type="text/css">
  <title>Document</title>
</head>

<body>
  <div id="container">
    <!-- 해야할 일 -->
    <div class="todoBox">

      <!-- 타이틀 -->
      <div id="titleText">해야할 일</div>

      <!-- 리스트가 생성될 자리 -->
      <div>
        <ul>
          <!-- 만약 data값이 참이라면 -->
          {% if data %}

          <!-- data값을 item으로 받아온다 -->
          {% for item in data %}

          <!-- 내가 가져온 index+1값이 현재 index값과 같은게 참이라면 다음 코드를 실행-->
          {% if index+1==loop.index %}
          <li class="list">
            <div class="updateBox">
              <form method="post" action="/update" class="inputForm">

                <!-- 기존 내용이 들어있는 input박스 -->
                <input type="hidden" name="index" value="{{index}}">
                <span><input type="text" name="todoText" value="{{item.todoText}}" class="titleInput"></span>
                <input type="submit" value="완료" id="updateBtn">
              </form>
            </div>
          </li>

          <!-- 위 if문이 거짓이라면 다음 코드를 실행 -->
          {% else %}
          <li>
            <div>
              <span>{{item.todoText}}</span>
              </form>
            </div>
          </li>
          {% endif %}
          {% endfor %}
          {% endif %}
        </ul>
      </div>
    </div>
  </div>
</body>

</html>
server.js
더보기
//express를 쓰기 위한 세팅
const express = require('express');
const app = express();
const list = require("./views/data")


//nunjucks를 쓰기 위한 세팅
const nunjucks = require('nunjucks');
app.set('view engine', 'html');
nunjucks.configure('views', {
  express: app,
  watch: true
});

//header body로 오는 세팅을 읽기 위한 세팅
app.use(express.urlencoded({ extended: true }))

//public폴더가 기본이 되도록하는 세팅
app.use(express.static('public'))

//홈 url의 요청에 index.html을 넘겨주는 app.get
app.get('/', (req, res) => {
  console.log("메인@", list)
  res.render('index', {
    data: list
  })
})

app.get('/update', (req, res) => {
  const index = req.query.index - 1
  res.render('update', {
    data: list,
    index: index
  })
})

app.post('/add', (req, res) => {
  list.push(req.body)
  res.redirect('/')
})

app.get('/delete', (req, res) => {
  const index = req.query.index - 1
  list.splice(index, 1)
  res.redirect('/')
})

app.post('/update', (req, res) => {
  const index = req.body.index
  const todoText = req.body.todoText
  list[index] = { todoText }
  res.redirect('/')
})

//브라우저의 요청을 항시 듣기위한 listen
app.listen(3000, () => {
  console.log('sever start');
})
data.js
const list =[];

module.exports=list
styleMain.css
더보기
*{
  margin: 0;
  padding: 0;
  box-sizing: border-box;
  font-family: FONT;
}

ul, li {list-style: none;}
a {text-decoration: none;}

#container{
  height: 100%;
  width: 100%;
  display: flex;
  justify-content: center;
  margin-top: 30px;
}

.todoBox{
  width:250px;
}

#titleText{
  font-size: 20px;
  font-weight: bold;
  margin-bottom: 10px;
}

.inputBox{
  width: 100%;
  margin-bottom: 30px;
}

.inputBox{
  width: 100%;
}

.inputForm{
  width: 100%;
  display: flex;
  justify-content: space-between;
}

input[class="titleInput"]{
  display: block;
  height: 30px;
  width: 200px;
  border-style: none;
  border-bottom: 1px solid #bcbec4;
  color:rgb(94, 99, 117);
}

input[class="titleInput"]:focus{
  outline: none;
}

#addBtn{
  display: block;
  padding:8px;
  border-style: none;
  border-radius: 20%;
  width:40px;
  height: 30px;
}

.list{
  display: block;
  width: 100%;
  display: flex;
  justify-content: space-between;
  margin-bottom: 8px;
}

.listText{
  display: block;
  width: 60%;
  padding-top: 5px;
}

#modBtn, #delBtn, #updateBtn{
  width: 15%;
  height: 25px;
  padding:5px;
  border-style: none;
  font-size: 13px;
  color:#3c3c3c;
  border-radius: 10%;
  background-color: #ededed;
  text-align: center;
}

#modBtn:hover, #delBtn:hover, #updateBtn:hover{
  border-style: none;
  border-radius: 10%;
  background-color:#4f76df;
  color:#ffffff;
  /* font-weight: bold; */
}
팁
1. 우선 눈에 보이는 뼈대를 만들기 (index.html에서 titile, input)
2. 추가 기능 만들기
3. 삭제 기능 만들기
4. 수정 기능 만들기
5. css 적용하기
'실천하기 > 한 입씩 먹는 홈페이지 만들기' 카테고리의 다른 글
| 09. 라우터로 복잡한 코드 분리하기 / express (0) | 2024.03.19 |
|---|---|
| 08. 쿠키를 이용한 로그인기능 만들기 / cookie-parser (0) | 2024.03.18 |
| 06. CRUD - 글 수정기능 만들기 (0) | 2024.03.17 |
| 05. CRUD - 삭제 기능 만들기 (1) | 2024.03.17 |
| 04. CRUD - 상세페이지 만들기 (0) | 2024.03.17 |


댓글